Welcome

Thank you for visting my blog. I am fortunate to have friends that love to craft. I hope to meet new frinds as time passes. I have been an avid scrapbooker & crafter since July 1996. Thanks Char. I hope that I can inspire others to enjoy crafting as I have.


Saturday, January 28, 2017

Fishing is Life in Color

Welcome, today I am sharing with you a layout I created using BoBunny paper collection "Life in Color"  This paper is beautiful it would be a great paper to use with zoo photo's or a safari, or an aquarium.


Full view of the 12 X 12 layout.


Close up of the photo's, framed with a large frame from the collection and a chipboard frame, fishing on the Columbia River, (Portland, OR) the flowers where made using BoBunny die Perfect Petals, using BoBunny Aqua & Emerald Brads for the center of the flowers


Letter disc embellish the layout in several areas. the elephant was cut out placed on black card stock  and raised up on pop dots, with a die cut crown using Royal die embellished with rhinestone and glossy accents. sits on the elephants head. 

Thanks for stopping by, if you like this collection check out www.BoBunny.com for this collection as well as the other 5 new collections. 


Thursday, January 26, 2017

Listen to your Heart

Welcome Quick Quotes friends, Kathi here today to share with you my 12 X 12 canvas layout. I prepared the canvas by painting white gesso then I used stencils with DAP Speckling paste to create the back ground. I then used several colors of sprays to finish the background.


Using Quick Quotes Whistlin Dixie paper collection I began to layer  QQP-WD102 as my base paper, adding a photo I then made flourish and a blooming heart using  QQP-WD100 to create flourishes to accentuate the photo. I finished off the layout by using Sugar & Gold Glimmer Spay.


 Close up of the flourish and the blooming heart.
Close up of the butterfly and the large clock


Supplies Used:
Quick Quotes:
    Whistlin Dixie Paper Collection
    Whistlin Dixie Chipboard Cutouts

Petaloo let your imagination Bloom mixed textured - Ivory

Intricate Dollie
Dies to cut the flourish  by BoBunny & heart by Stampin Up
Sprays:
   Distress stain - Barn Door
   Distress stain - Cracked Pistachio
   BoBunny - Frost Glimmer Spray
   BoBunny - Sugar Glimmer Spray
   Dylusions - Crushed Grape
Stackable Stencils -
    Love
    Fanciful
    Hearts
DAP Spackling Paste

Thanks for stopping by today.
Kathi

Tuesday, January 17, 2017

Loaded Envelope Tutorial

Hello crafty friends this is a tutorial for the loaded envelope. 


 Front of Loaded Envelope

Cut the front panel 8.5 X 9.5 Score the panel at .5 - 1- 7 - 7.5 and 8" on the 8.5" side and .5"
on one side of the long" side.


Back of envelope

Cut the second panel at 7" X 9" score on the 7" side at .5" and 6.5"


Small pocket
Cut the small pocket at 8" X 4.5" score at .5 - 1" - 7" - 7.5" score on the long side at .5"


Large Pocket

Cut the fourth & last piece of paper at 8" X 6.5" score on the 8" side at .5" - 1" - 7" and 7.5" and score on the 6.5" side at .5"

Once all pieces are cut and scored the small pocket goes on the front of the panel and the large pocket goes on the back panel. You will have a gusted on both side once the panels are put together. On the front of the front panel you can create it panel as you like. I cut down approximately 3" then put in 3 to 4 holes on each side of the cut line.  Then you can curve up the sides by the  cut line then lace ribbon to create a laced corset look.  Cut a patterned paper to fit both panels and both pockets. Fill the envelope with things you will create such as tags, cards, goodie bags, let your imagination soar. you can decorate the loaded envelope pocket as you wish. Enjoy. 


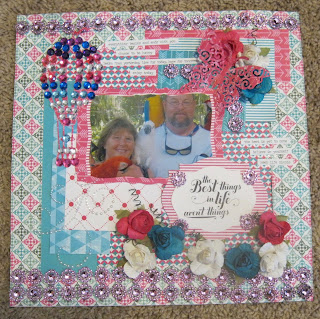
Best Things in Life

Good day crafty friends, I have used Quick Quotes Winter Wishes Collection.**


12 X 12 Layout highlighting Quick Quotes Winter Wishes. Using Two pieces of 12 X 12 paper Winter Wishes QQP-W1100 & QQP-W1101**


Using a balloon die as a template, bling was glued to the balloon. The balloon was placed adjestant to the photo.


The butterfly was placed over three roses. a thin layer of glue was painted on the butterfly for the glitter to adhere to.  The roses were placed over the layered paper.


White, Fuchsia, & Blue roses were added underneath the stamped sentiment and meshed bling finished the layout both at the top and the bottom of the layout.


Quick Quotes ** Winter Wishes - is a new paper line.
Sizzix die - labels, butterfly, labels 2
Accu-cutt - large tag
Mesh Bling
Roses

Thanks for stopping by today.
Kathi

Saturday, January 14, 2017

Valentine Gift Set

Hi, It's that time of year and love is in the air. Love is an expression of an intense feeling of deep affection. There are many ways to express such intense affection.  These valentine gift set is for those who want to share their affection with those they care about.  This gift set consist of a large tag, a shaped gift tag, two small embellishments and a dangle charm.


The red pouch was made from red burlap(KS4U) lace trim with a row of pink mesh plink attached to the lower lace trim. around the middle of the bag a rainbow mesh bling was added.   the corners of the center was turned down to create a V the bag enter embellishments on top of the rainbow mesh bling consist of a small paper heart, roses leaves an sprays.


Large tag embossed with a beautiful heart. The tag was then distressed with distress ink "festive berries." distress ink by Tim Holtz.


a charm dangle was attached to the large distressed tag. Many charms were attached to the chain.
all charms came from KS4U, bronze keys, an anchor, rose, steampunk  clock, black gears, beads


The shaped gift tag was created by using a Sizzix die "Heart with Wings #2" I cut out 5 layers of the die glued together to create a chipboard, the chipboard was then covered with patterned paper. The tag was then embellished with roses, sprays, charms and a Tim Holtz ticket. On the back of the tag 

Two tiny embellishments, a mini frame & a placard. On the mini frame distressed with white gesso and metallic rub on's.  Finished by adding 3 roses in two corners. On the LIVE placard it was distressed with white gesso on the corrugated board & painted with metallic red acrylic paint.

Supplies Used:
KS4U  
Lace/trims
Roses
Charms
Mesh Bling

Embellishments from my stash
Die Cuts:
Sizzix
Accu-cut

www.ks4u.net/store
www.facebook.com/kathimann

Monday, January 9, 2017

Dream Big with 49 Shades of Grey

Welcome quick quote friends and family, Kathi here to share with you today with you two beautiful cards, I used Quick Quotes "49 Shades of Grey,".


Dream big with 49 shades of grey full view


 Dream big card is a 51/2 X 51.2" card card base is calypso coral with an olive green then layered with 49 shades of grey #105 embellished with an olive grosgrain ribbon  with a large flower and two 49 Shades of Grey Die Cut Stickers. 


Happy Birthday is a 41/4 X 51/2" card, the card base is an olive green layered with 49 shades of grey #101. and a small strip of paper with a flourish bling. The large flower was created by using 49 shades of grey 101 & 105.

Supplies Used:
Quick Quotes patterned paper collection -
  49 Shades of Grey #101 and
  49 Shades of Grey #105
2016 Barn Board PowderPuff Ink,
2016 Green Leaf Powderpuff Ink